Crayonic Badge Sign-in Setup
How to set up Windows machines so that people sign in by holding their Crayonic badge near the bridge. On one machine you install the agent, open its settings window, apply the preset for your sign-in method (smartcard or Entra FIDO) and pin the updates. The same window shows the bridge and the badges, installs firmware and agent updates, and exports the setup for Group Policy so that every other machine gets the same settings. None of this needs the Crayonic Device Manager (CDM).
Where this fits
This guide uses the Crayonic Agent and the credential provider that comes with it (CP3, nothing to install separately), with a Crayonic Bridge. It applies to Crayonic Agent 1.0.625 and later, and 1.0.633 is the recommended build; the screenshots are from a test machine. See Solution Architecture for how these parts fit together.
The steps at a glance
- Install the agent
- Open the settings
- Remove the old provider
- Apply the preset
- Pin the updates
- Check the devices
- Sign in with the badge
Before you start
The badge signs a user in to Windows in one of two ways. Pick the one that fits your machines; the settings window has a preset for each.
| Smartcard (PIV certificate) | Entra FIDO | |
|---|---|---|
| The badge proves who the user is with | a smart card certificate, checked by the domain controller (a Kerberos smart card logon) | a passkey for the user's Microsoft Entra ID account, checked by Entra |
| The machine must be | in an Active Directory domain | Microsoft Entra joined, or hybrid joined |
| The bridge works as | a smart card reader | a FIDO security key |
| On each badge | a PIV certificate issued to its user | a passkey registered to its user's Entra account |
For either method, have these ready:
- Administrator rights — to install the agent and to open its settings window.
- A Crayonic bridge — plugged into a USB port of the machine.
- A Crayonic badge per user — with the user's certificate or passkey on it (below).
- Internet access — for downloading the agent and for updates from release.crayonic.io. An Entra FIDO sign-in also needs the logon screen to reach Microsoft Entra ID.
For a smartcard sign-in:
- Windows 10 or 11, in a domain — a smart card logon is a Kerberos logon. A workgroup machine cannot use it.
- A certificate per badge — a smart card (PIV) certificate issued to the badge's user by your certificate authority.
- Certificates mapped in AD — each badge certificate strongly mapped to its user (see Troubleshooting).
For an Entra FIDO sign-in:
- Windows 10 1909 or later, or Windows 11 — Microsoft Entra joined. A hybrid joined machine needs Windows 10 2004 or later and Microsoft Entra Kerberos set up in Active Directory. Not Windows Server.
- A passkey per badge — a passkey (FIDO2 security key) on the badge, registered to its user's Microsoft Entra account.
- Passkeys allowed in the tenant — the Passkey (FIDO2) authentication method enabled for these users in Microsoft Entra ID.
1. Install the agent
Download the agent installer (CrayonicAgent_x64_<version>.msi) from the Crayonic release site. Each release channel has its own page. Use STABLE unless Crayonic has told you otherwise.
- STABLE: release.crayonic.io/Agent/STABLE
- ALPHA: release.crayonic.io/Agent/ALPHA
- DEV: release.crayonic.io/Agent/DEV
The recommended build is 1.0.633 on STABLE: CrayonicAgent_x64_1.0.633.msi.
Double-click the MSI and follow the installer, or install it silently from an administrator command prompt. On a machine that CDM will never manage, add CLOUDSYNCENABLED=0: the agent then sends nothing to CDM.
msiexec /i CrayonicAgent_x64_<version>.msi CLOUDSYNCENABLED=0 /qn
Each release also publishes a transform, CrayonicAgent_x64_<version>_CloudSyncDisabled.mst, which does the same for deployment tools that take a transform instead of a property: msiexec /i <msi> TRANSFORMS=<mst> /qn. Group Policy software installation is one of them (step 11).
Cloud sync off
With cloud sync off, the agent sends nothing to CDM: no events, no heartbeat and no crash reports. It does not connect to CDM's messaging service (MQTT), so CDM cannot send it commands. Its settings come only from this machine and from Group Policy.
Agent and bridge firmware updates still download from release.crayonic.io, as the update policies say (step 5). No firewall rule is needed.
Events recorded while cloud sync is off are never uploaded, not even after cloud sync is turned back on.
Plug in the bridge. The agent runs as the Windows service Crayonic Agent and starts on its own.
2. Open the settings window
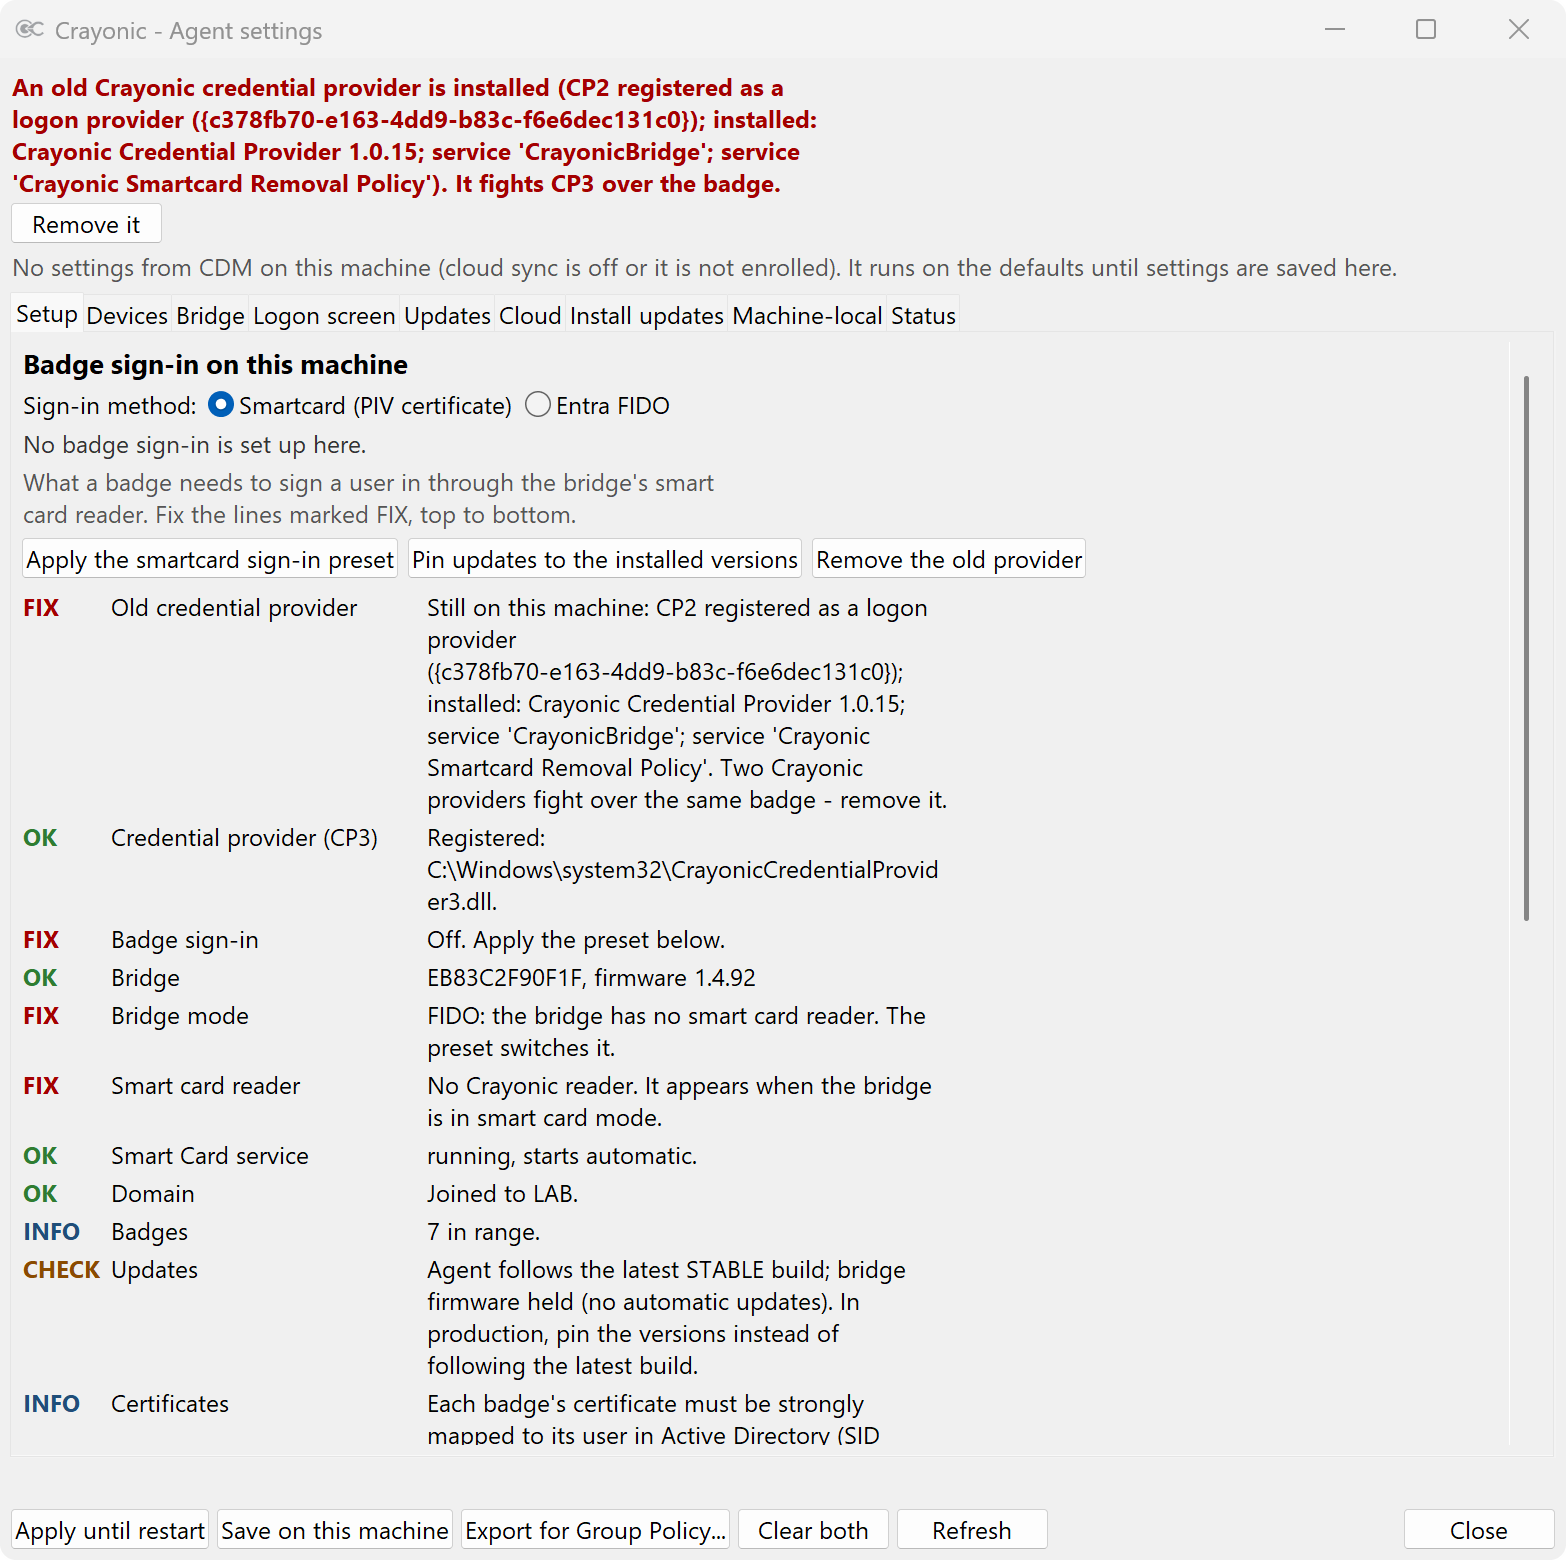
Open Start → Crayonic → Crayonic - Agent Settings and accept the administrator prompt. The window opens on the Setup tab. It shows one line for each thing a badge sign-in depends on, marked OK, FIX, CHECK or INFO. Work through the FIX lines from top to bottom.
Note
No Start menu entry? Run "C:\Program Files\CrayonicAgent\CrayonicAgentService.exe" --settings --gui from an administrator prompt. Without --gui, a run from a prompt prints the settings as text instead.
3. Remove the old credential provider
Machines that had an earlier Crayonic logon tile still carry the old credential provider. That is either CP1 (2023, CrayonicCredentialProvider.dll) or CP2 (the Crayonic Credential Provider MSI, CrayonicCredentialProvider2.dll). The old provider and the agent's provider (CP3) would both pick up the same badge and cancel each other's sign-in, so the old one has to go. If the window shows a red banner about it, click Remove the old provider (or Remove it in the banner).
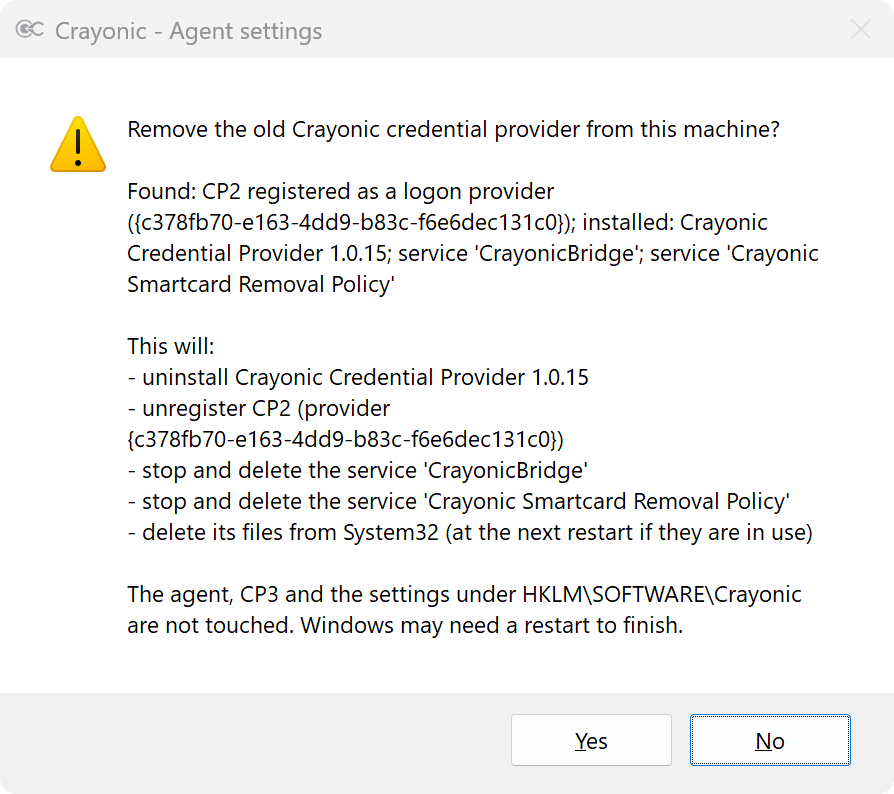
Click Yes. The agent then:
- uninstalls the old MSI;
- unregisters the old provider;
- stops and deletes its two services (
CrayonicBridgeandCrayonic Smartcard Removal Policy); - deletes its files from
System32.
It never touches the agent, CP3 or the settings under HKLM\SOFTWARE\Crayonic. Progress shows at the bottom of the window and on the Install updates tab.
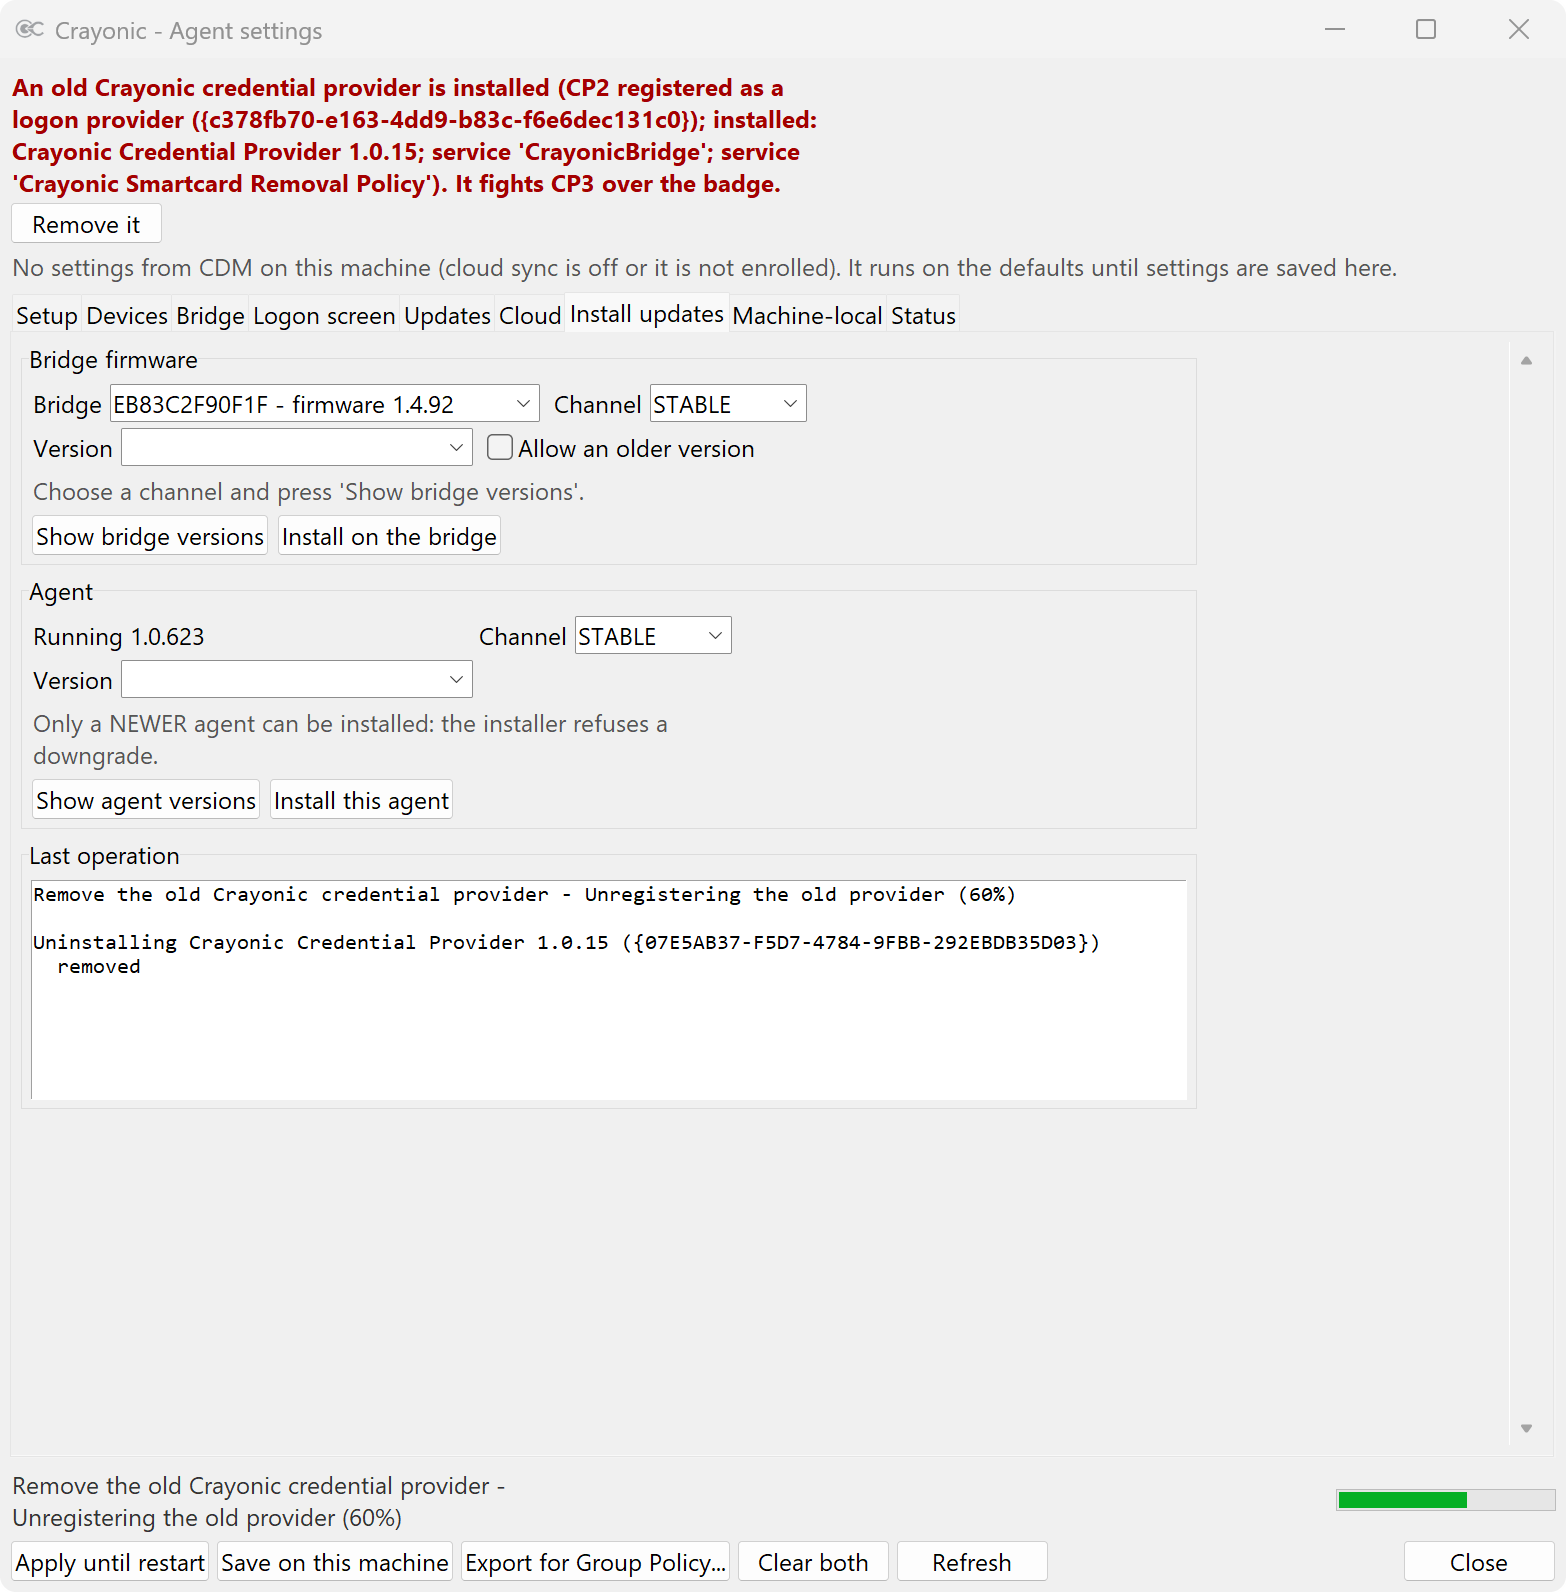
Warning
If a file is in use, Windows deletes it at the next restart, and the window says so. Restart when convenient. The old provider is already unregistered, so it does nothing until then.
If the window only reports left-over files (the provider is no longer registered), they are harmless. Delete the left-over files removes them.
For many machines, a startup script does the same (step 11).
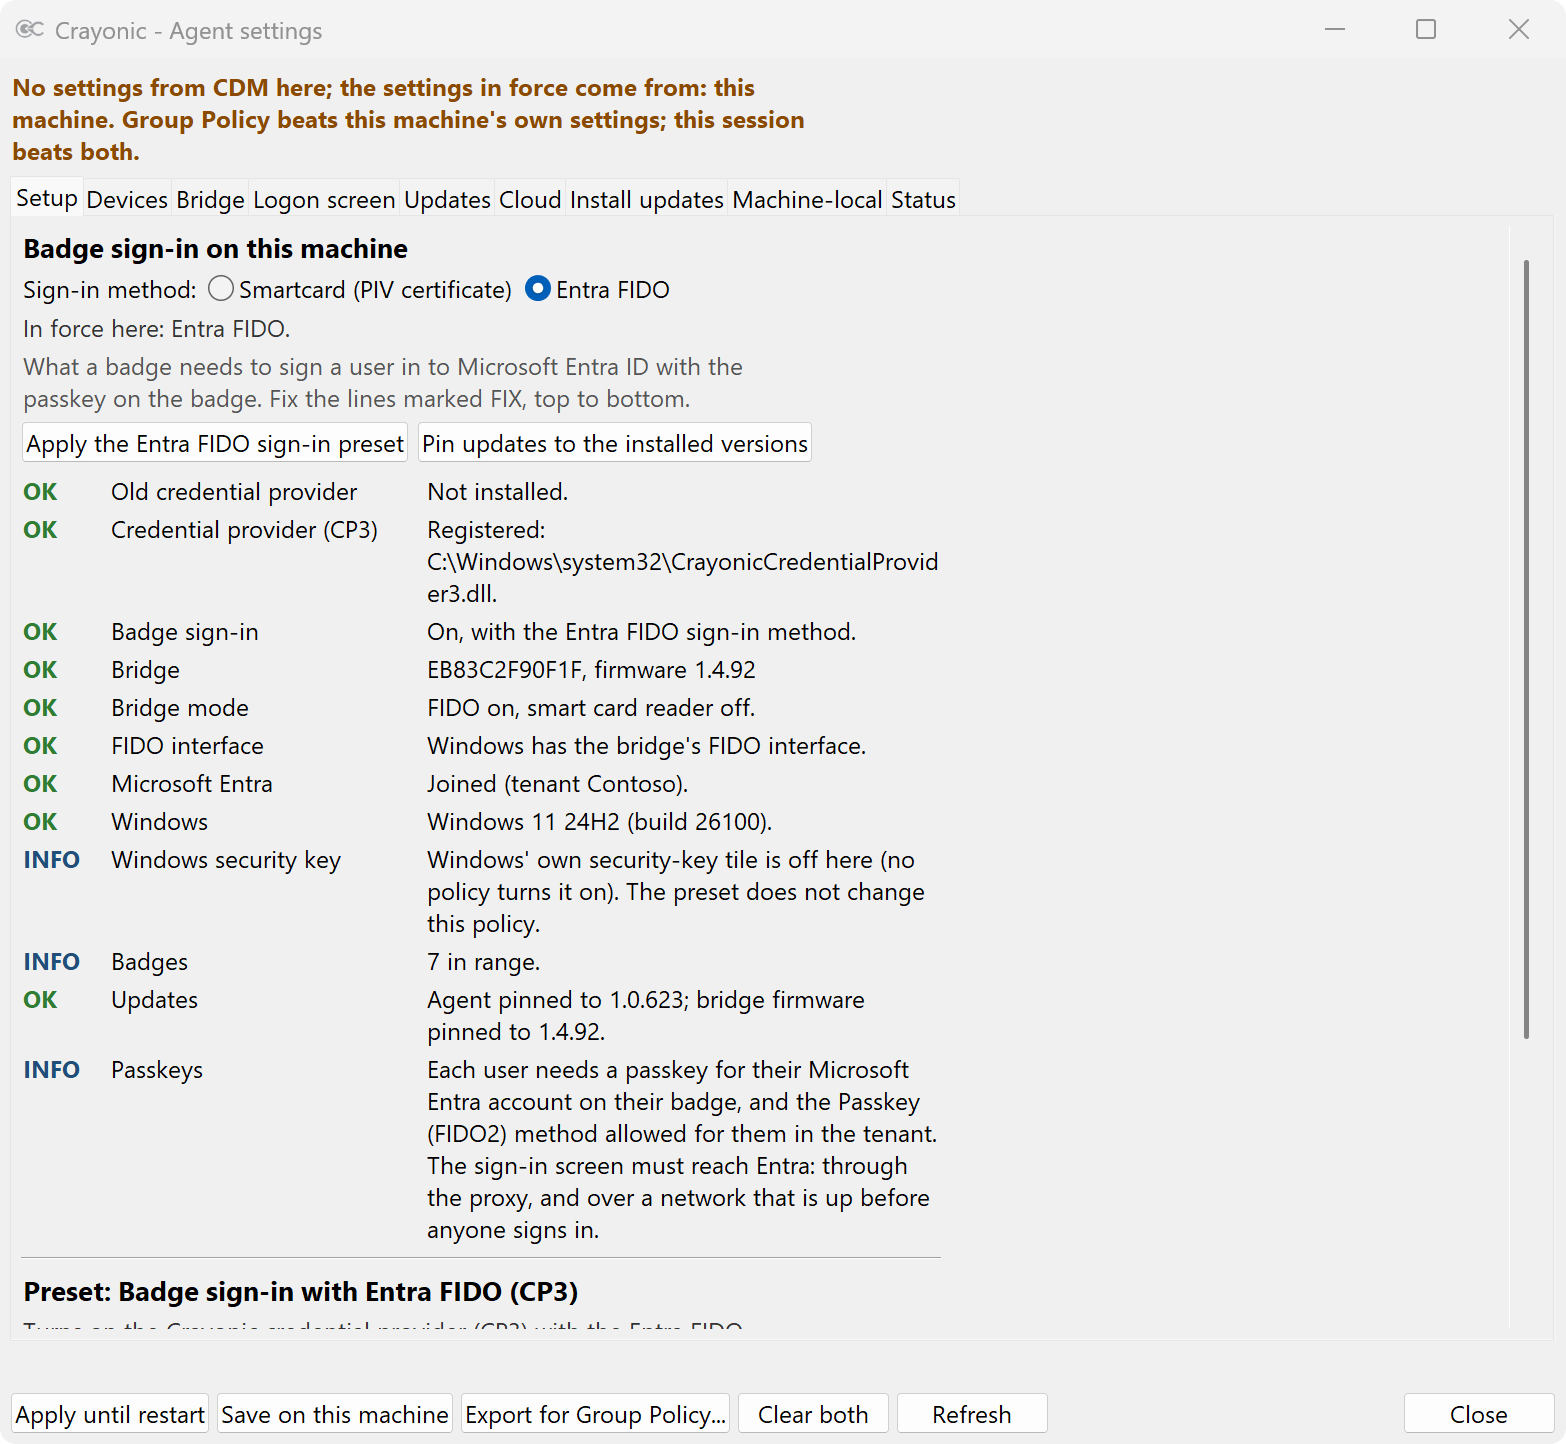
4. Apply the sign-in preset
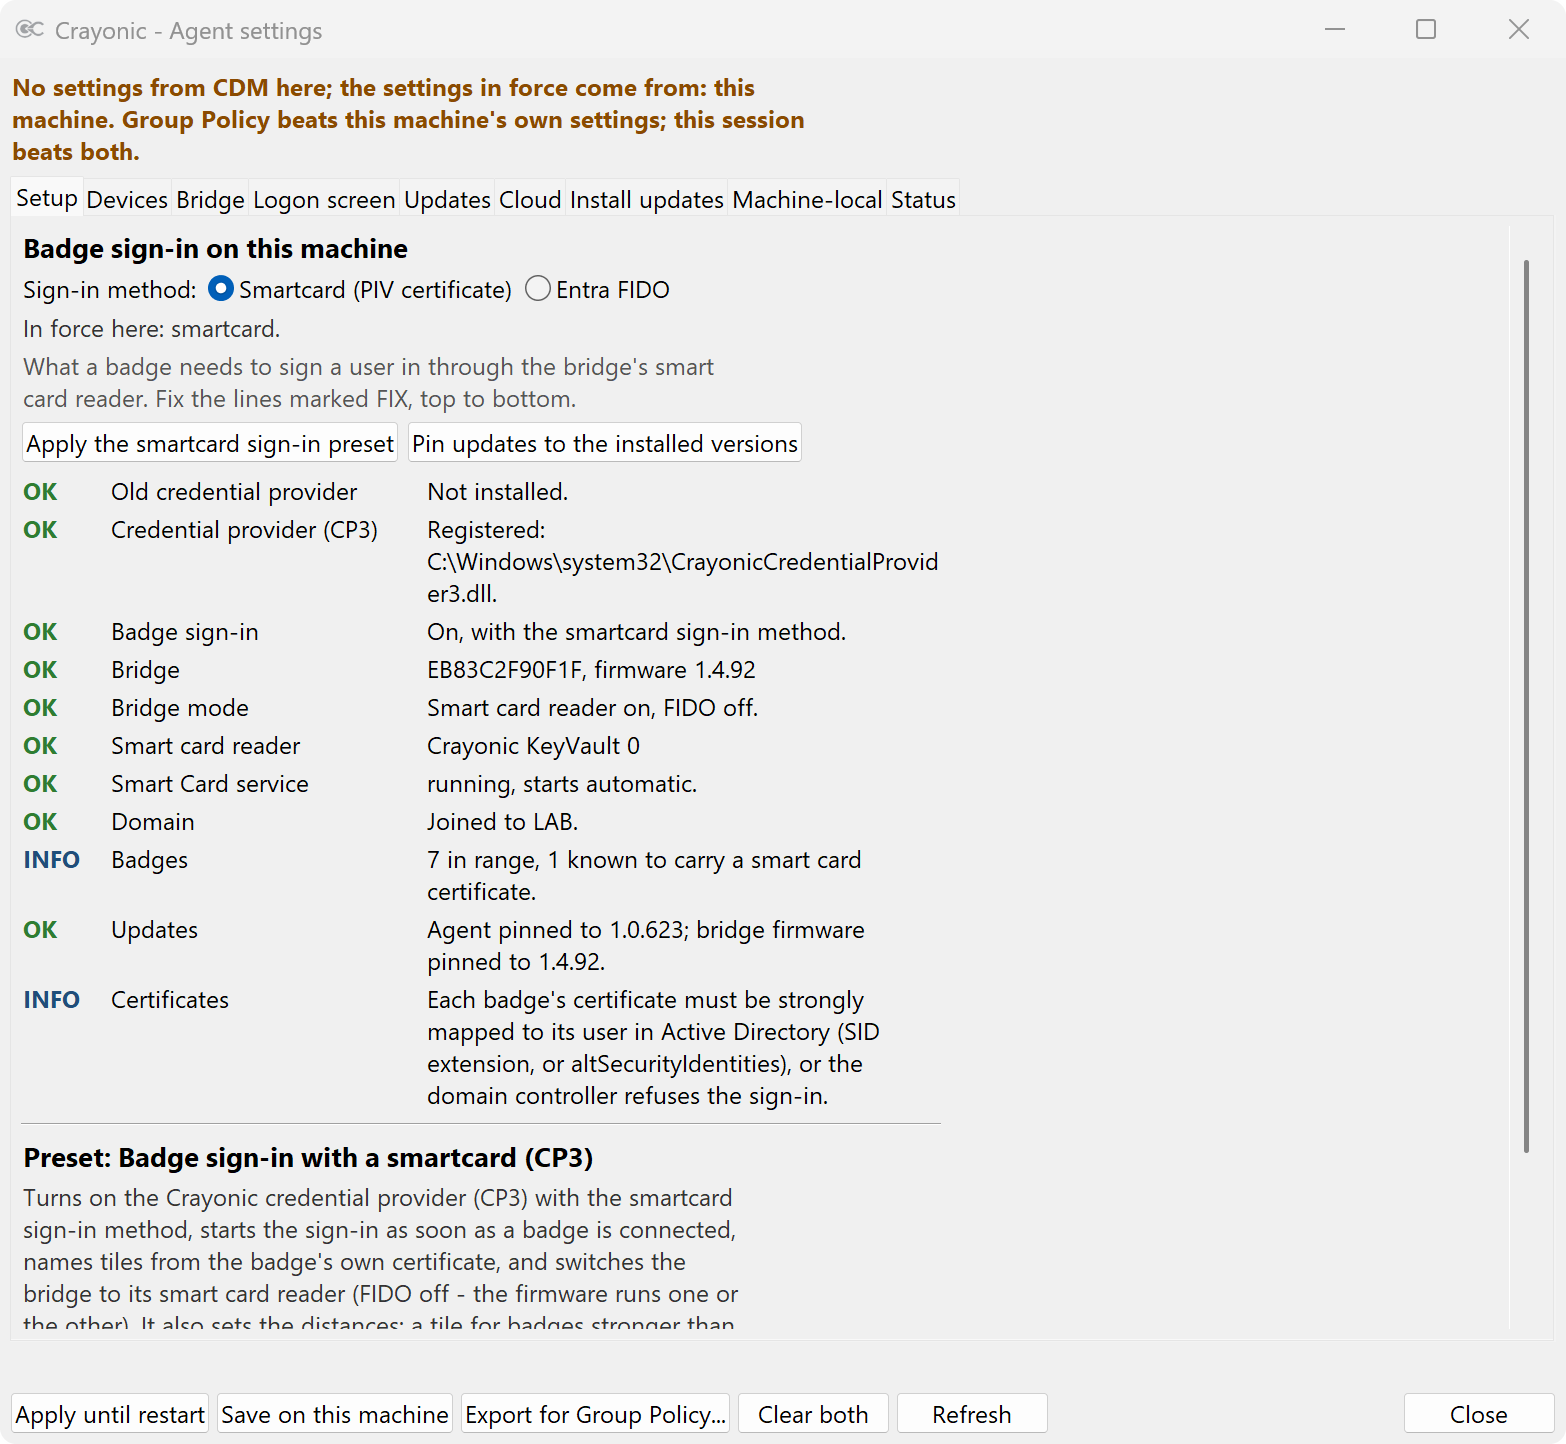
At the top of the Setup tab, under Sign-in method, choose Smartcard (PIV certificate) or Entra FIDO. On a machine where neither is set up yet, the tab starts on Entra FIDO if the machine is Entra joined and not in a domain, and on smartcard otherwise. Choosing changes only what the tab shows: the lines below it check what that method needs, and nothing is saved yet.
Then click Apply the smartcard sign-in preset or Apply the Entra FIDO sign-in preset. Either preset sets everything its sign-in needs in one go:
- It turns on the Crayonic credential provider (CP3) with the chosen sign-in method.
- It starts the sign-in as soon as the user's badge connects, without a second click.
- It names the logon tiles from the badge itself: from its certificate (smartcard), or from its sign-in once it has signed in on the machine (Entra FIDO).
- It switches the bridge to the interface the method uses: the smart card reader for smartcard, FIDO for Entra FIDO. The bridge runs one or the other.
- It sets the distances, the same for both methods:
- A tile appears for a badge whose signal is at least -60 dBm, and stays until the signal drops below -70 dBm.
- The bridge connects a badge only when it is held close (-40 dBm).
- The bridge keeps the badge until the link is lost.
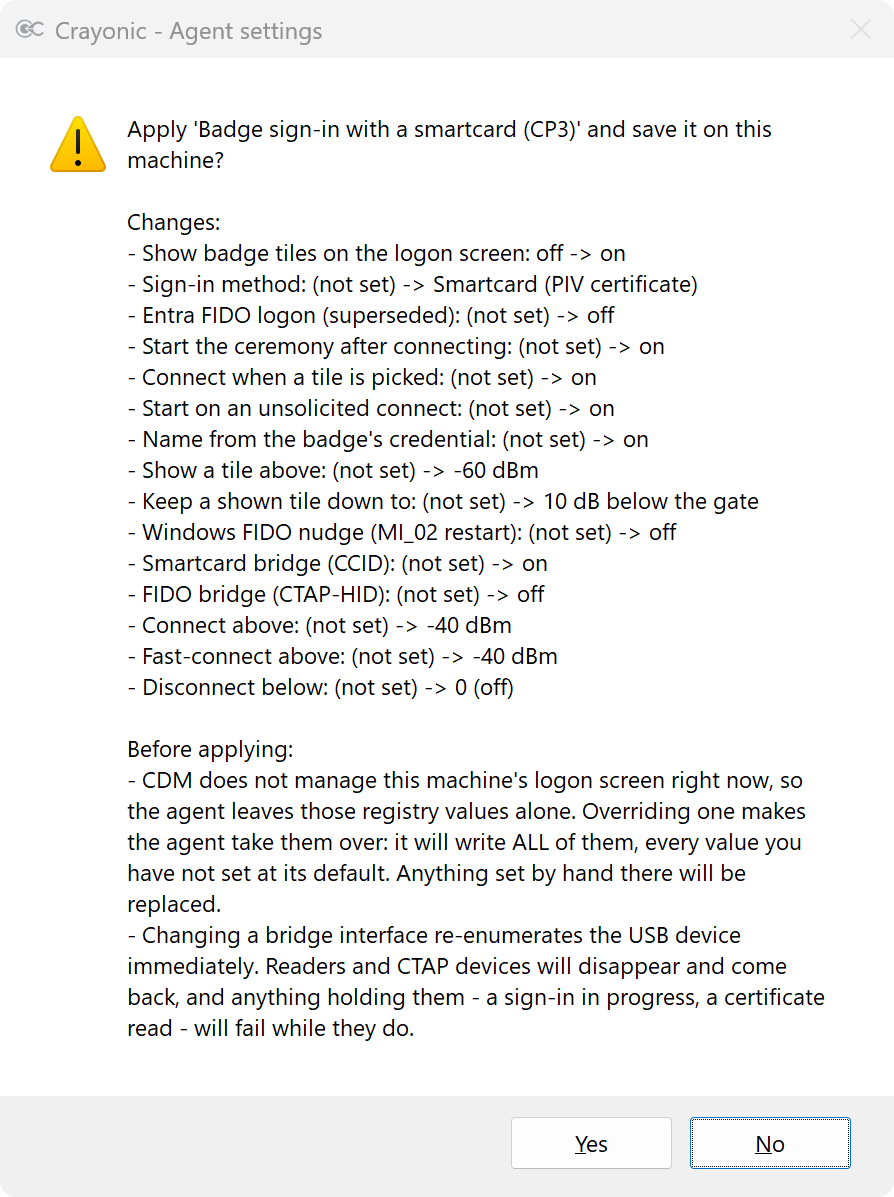
Click Yes. The preset is saved on the machine itself (HKLM\SOFTWARE\Crayonic\Agent), so it survives restarts and works without CDM. Anything else saved on the machine before is kept. Both presets set the same settings, so applying one after the other leaves nothing of the first behind.
Note
The bridge restarts its USB connection to switch interfaces. Within about ten seconds its smart card reader, Crayonic KeyVault 0, appears (smartcard), or its FIDO interface comes back (Entra FIDO). Press Refresh.
5. Pin the updates
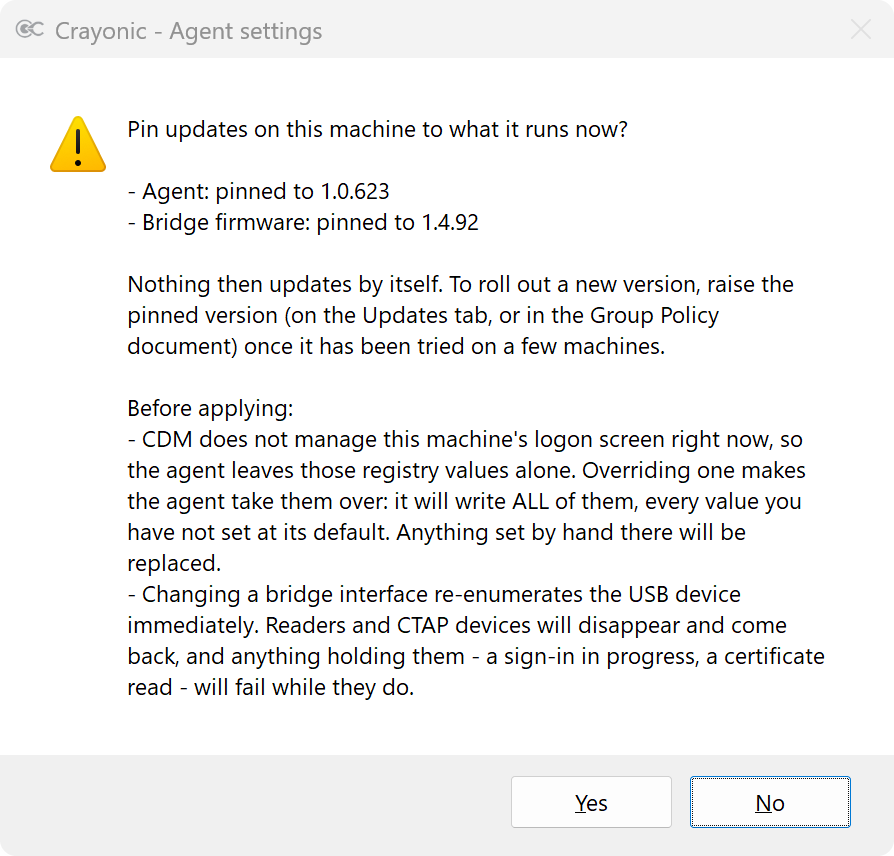
If nothing is set, the agent installs the newest agent build from the STABLE channel by itself, as soon as it is published. That is convenient on a test machine but not in production, where a new release should reach your machines only after you have tried it on a few of them. So pin the versions. While either the agent or the bridge firmware follows the latest build, the Setup tab's Updates line reads CHECK.
Click Pin updates to the installed versions on the Setup tab. It saves two update policies on the machine:
- the agent pinned to the version it runs;
- the bridge firmware pinned to the version the bridge runs.
To roll out a new version later, raise the pinned version once it has worked on a few machines. You can do that on the Updates tab, or in the Group Policy document (step 11). The version must be published on the channel the policy names, which is STABLE unless you set another.
6. Check the bridge and the badges
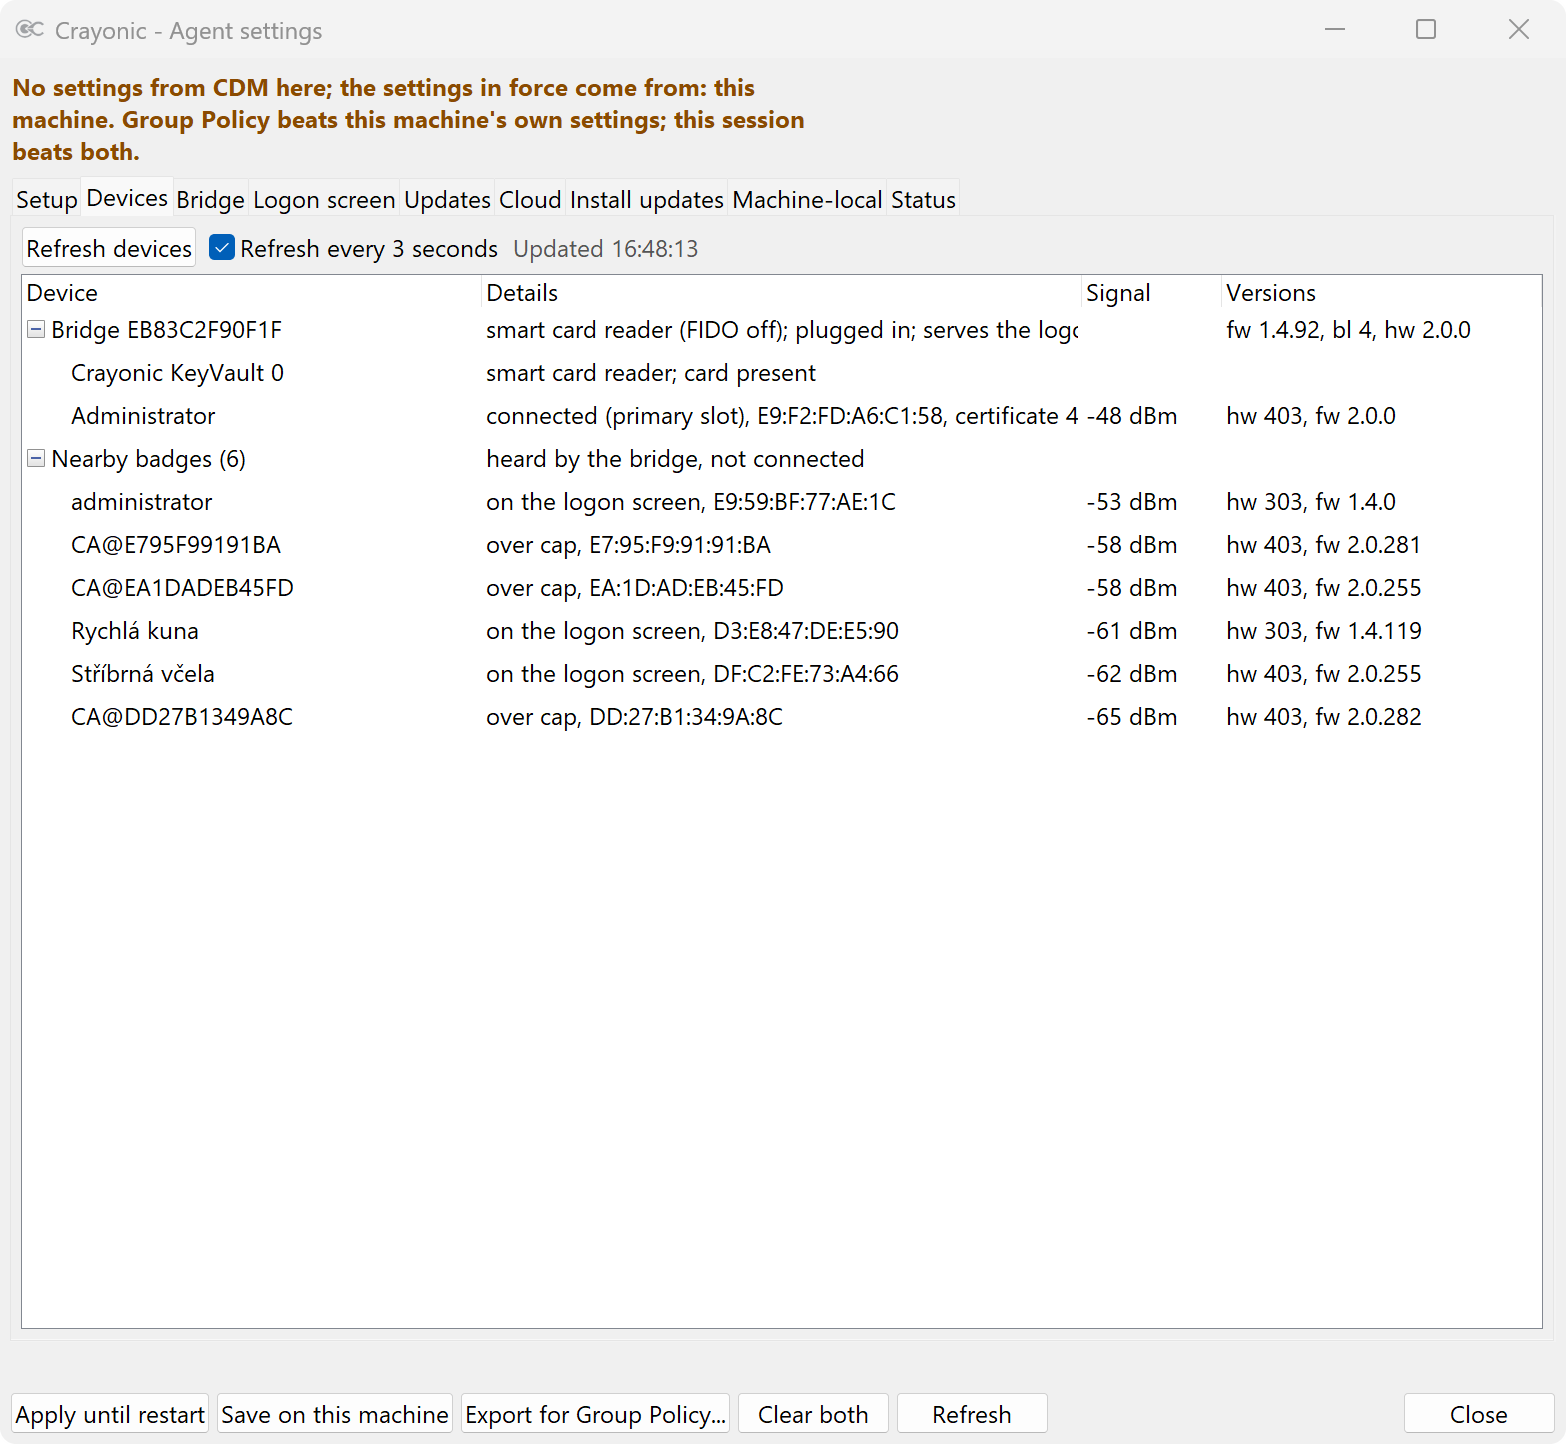
The Devices tab shows what the agent sees, refreshed every three seconds:
- Bridge: its serial number, its firmware, bootloader and hardware versions, and its mode. Serves the logon screen marks the bridge the sign-in uses.
- Under each bridge: its smart card reader (smart card mode only) and the badge connected to it, with the badge's certificate.
- Nearby badges: every badge the bridge hears, with its signal strength and why it does or does not have a tile on the logon screen:
- on the logon screen: it has a tile;
- below rssi: the badge is too far away;
- over cap: there are more badges than tiles.
7. Sign in with the badge
- Sign out, or restart the machine. The logon screen shows a tile for each badge near the machine.
- The user holds their badge close to the bridge and selects its tile. The bridge connects the badge and the sign-in starts by itself.
- The user confirms on the badge if it asks, and Windows signs them in.
Smartcard: the tiles are named from the badges' certificates. The agent reads a badge's certificate while someone is signed in on the machine and the badge is connected; until then its tile shows a generated name. The first sign-in on a machine takes a few seconds while Windows reads the badge's certificate; later sign-ins are faster.
Entra FIDO: the badge signs the user in to Microsoft Entra ID with its passkey, after the user confirms on the badge. A badge's tile carries a generated name until the badge has signed in on the machine once, and the user's name from then on.
8. Update the bridge firmware (optional)
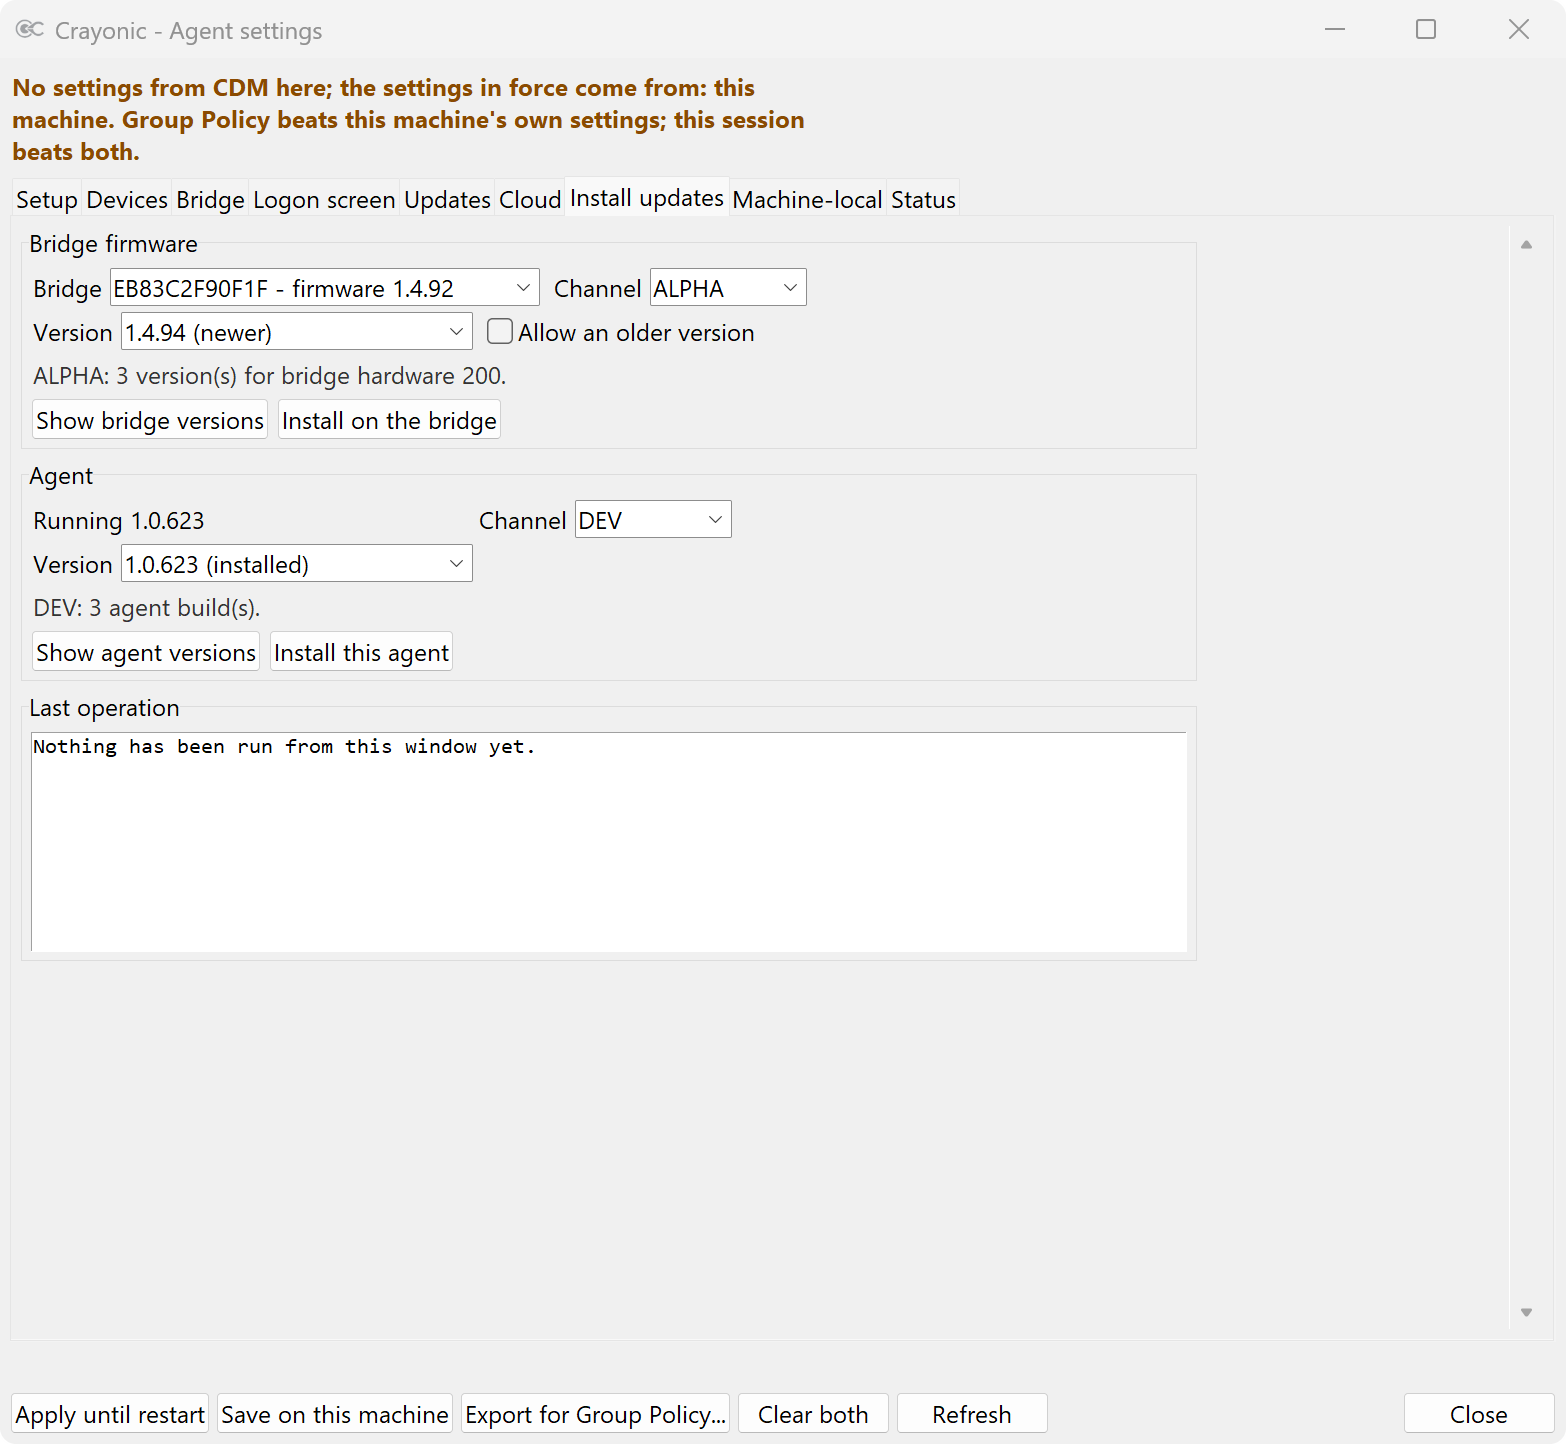
On the Install updates tab, under Bridge firmware:
- Choose the bridge and a channel (STABLE, BETA, ALPHA or DEV), and click Show bridge versions. Each version is marked as newer or older than the installed one.
- Pick a version, click Install on the bridge, and confirm.
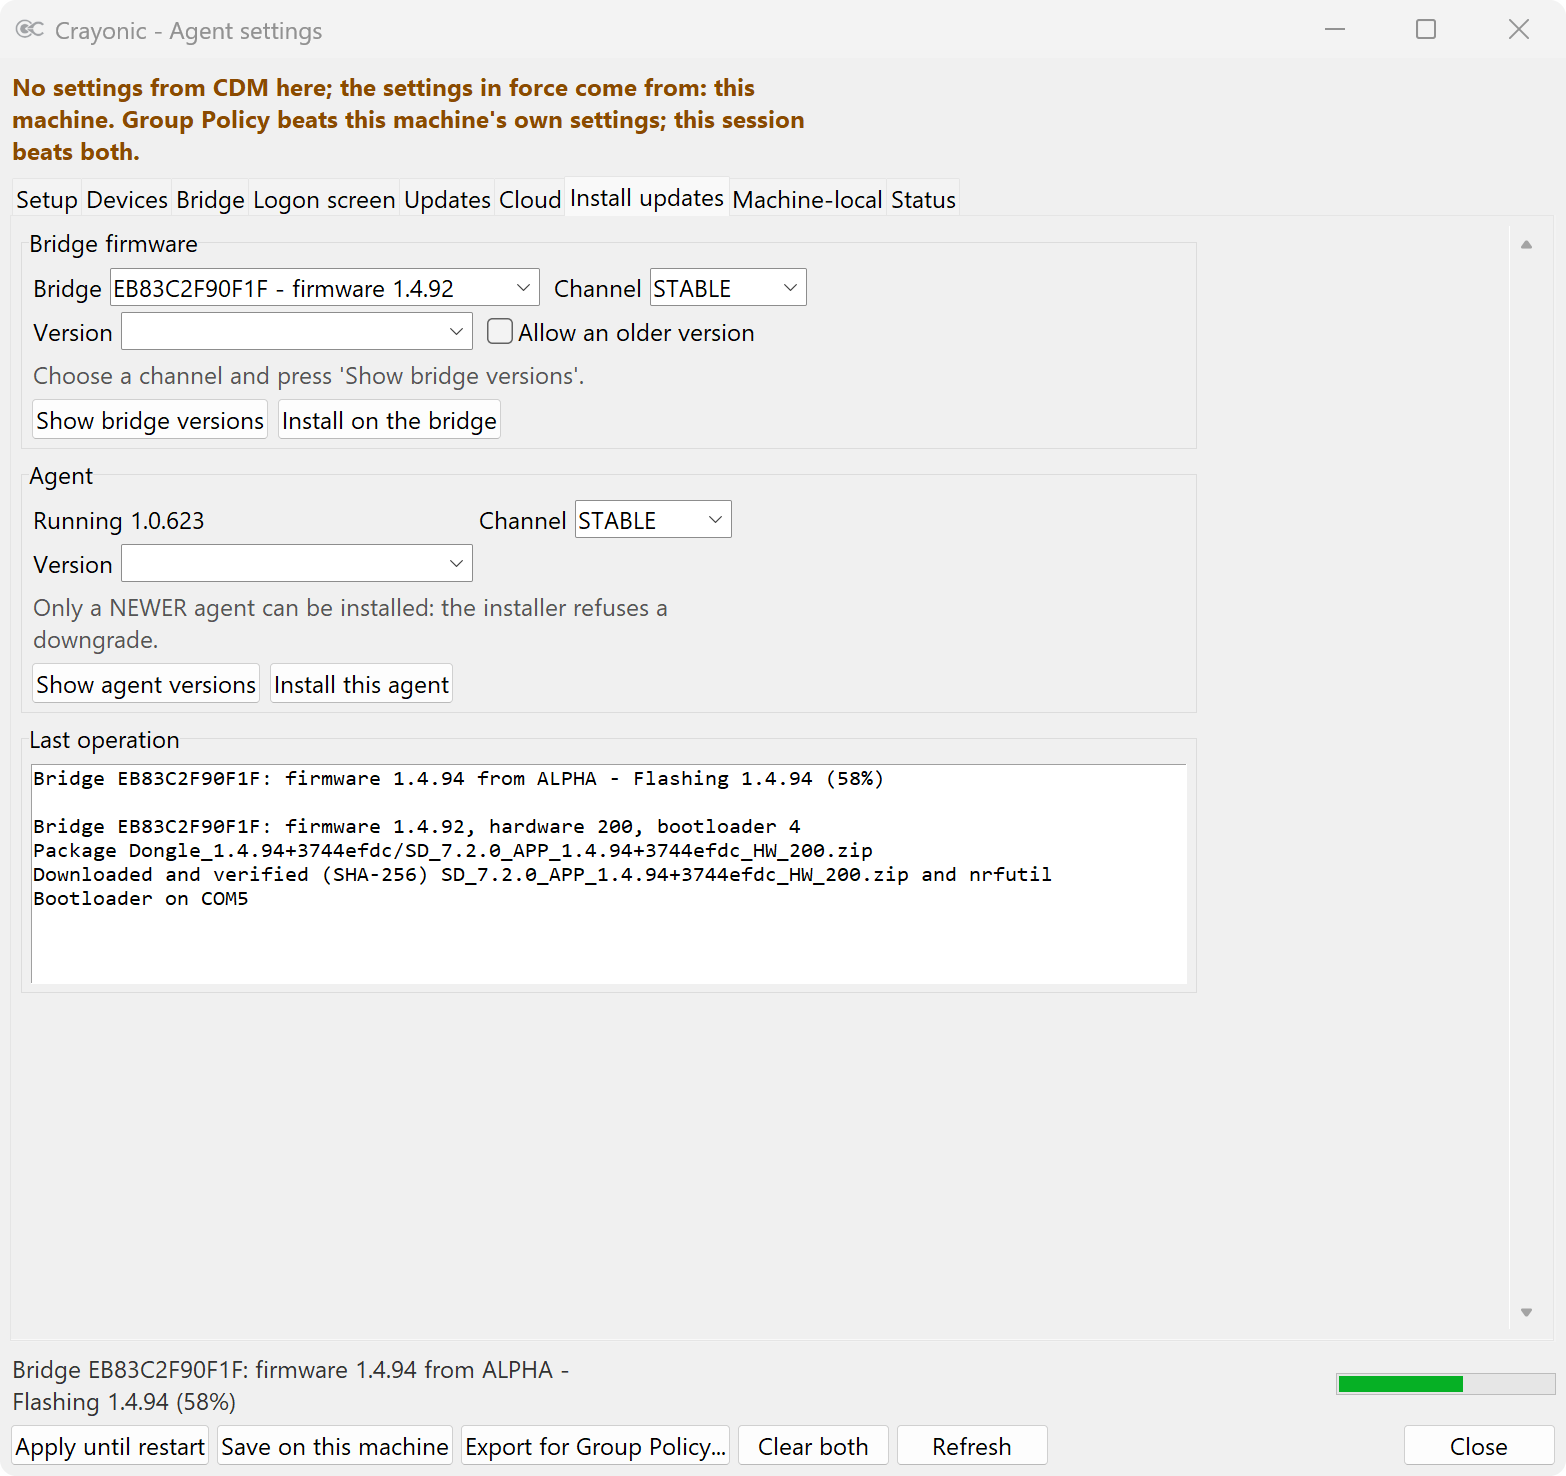
The agent:
- downloads the firmware and checks its SHA-256 against the release database;
- restarts the bridge into its bootloader and flashes it;
- reports success only once the bridge is back and reports the new version.
Warning
Do not unplug the bridge while it is being flashed. During that minute there is no badge sign-in. Installing an older version needs Allow an older version, and the bridge's bootloader may refuse it. The window then says so, and the bridge keeps its firmware.
A pin only stops automatic updates, so installing by hand works on a pinned machine too. Afterwards, click Pin updates to the installed versions again so that the pin matches the new version.
9. Update the agent (optional)
On the same tab, under Agent:
- Choose a channel and click Show agent versions.
- Pick a newer version and click Install this agent. Only newer versions install: the installer refuses a downgrade.
The agent downloads the installer and checks its digital signature against the Crayonic release key built into the agent. The settings window then closes so that the installer can replace its files. The agent stops, the installer runs, and the agent starts again on the new version, all within about a minute.
Open the settings window again to confirm the version, and pin the updates again if this machine is pinned.
10. Copy the settings to other machines (optional)
The preset, the pin and anything else saved on the machine form one settings document. To hand it on, click Export for Group Policy… at the bottom of the window. The dialog shows the document and what it changes.
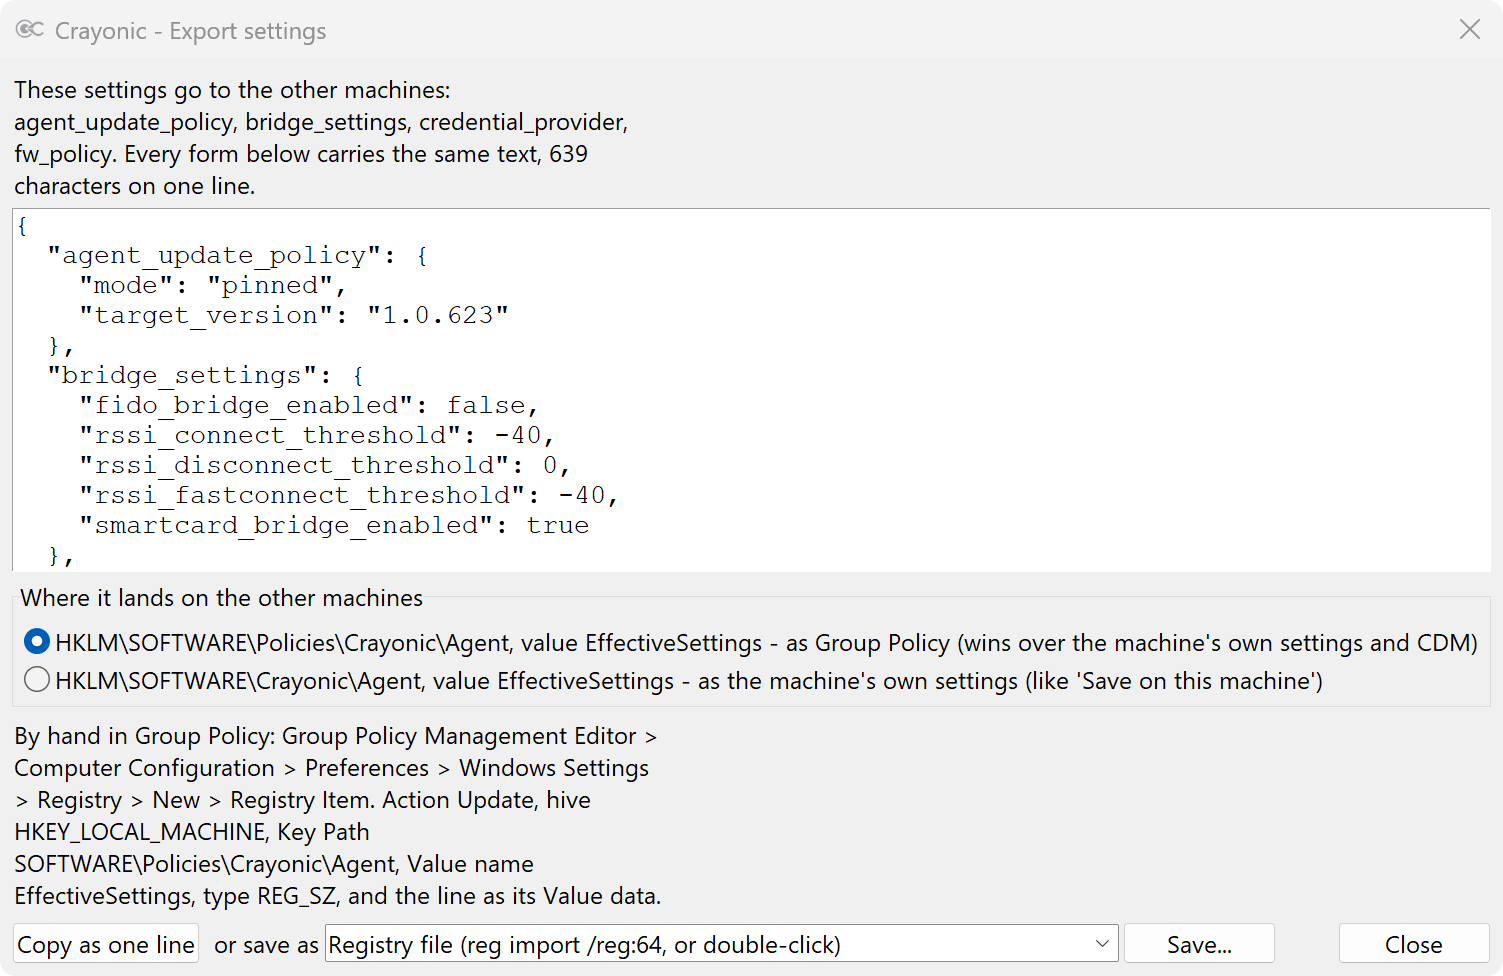
Choose where the settings land on the other machines:
- The Group Policy key (
HKLM\SOFTWARE\Policies\Crayonic\Agent, the default). It wins over a machine's own settings and over CDM, and the settings window on those machines cannot change it. - The machine's own key (
HKLM\SOFTWARE\Crayonic\Agent), like Save on this machine. Written once, with the.reg, the.ps1or--import, it stays editable on each machine. A Group Policy item for this key rewrites it at every policy refresh, undoing what was saved on the machine, so for Group Policy use the Group Policy key.
Then take it in the form your route needs:
| Form | Use it for |
|---|---|
| Copy as one line | The Value data of a Group Policy registry item (step 11). Always paste it as one line. |
Registry file (.reg) |
Run reg import <file> /reg:64 as an administrator, or double-click it. Use it for a machine outside a domain, or a disk image. |
Group Policy Preferences item (.xml) |
Paste it into the Group Policy Management Editor instead of typing the item. |
PowerShell script (.ps1) |
Run it as SYSTEM or as an administrator: an Intune platform script, a startup script, or by hand. It writes the value, reads it back, and exits 0 or 1. |
GPO script (.ps1) |
Run it on a domain controller or on a machine with the Group Policy Management tools. It adds the registry item to a GPO: .\crayonic-gpo.ps1 -GpoName "Crayonic Agent". If the GPO already has an item for this value, it stops; -Replace replaces every such item, hand-made ones included. |
JSON document (.json) |
Keep it, or load it on another machine with --import. |
The same works from an administrator command prompt, without the window. Without --to, an export targets the Group Policy key. The second command saves an exported JSON document as another machine's own settings:
"C:\Program Files\CrayonicAgent\CrayonicAgentService.exe" --settings --export C:\Temp\crayonic-settings.reg
"C:\Program Files\CrayonicAgent\CrayonicAgentService.exe" --settings --import C:\Temp\crayonic-settings.json
Note
In a batch file these commands wait and return their exit code. PowerShell does not wait for them: start them with Start-Process -Wait -PassThru (see step 11).
Note
The export holds settings only. It never contains a credential, and never the agent's connection to CDM. Group Policy files can be read by every computer in the domain, so the document is no place for secrets anyway.
11. Distribute with Group Policy, without CDM (many machines)
In an Active Directory domain, one Group Policy object (GPO) can do for every machine what steps 1 to 5 did for one. You need the Group Policy Management console and a GPO linked to the organizational unit (OU) that holds the machines.
11.1 Install the agent
- Put the MSI and the
_CloudSyncDisabled.mston a share that computer accounts can read, for example\\fileserver\software\Crayonic\. - In the GPO, open Computer Configuration → Policies → Software Settings → Software installation. Choose New → Package… and select the MSI by its UNC path, not a mapped drive.
- Choose Advanced, and on the Modifications tab add the MST. Do this before clicking OK, because a transform cannot be added afterwards. Leave the deployment type Assigned.
Machines install the agent at their next startup, not on a background refresh. Run gpupdate /force and restart. With fast logon on, it can take two restarts.
The MST only affects first installs. For machines that already have the agent, add a registry item to the GPO that sets CloudSyncEnabled = 0 (REG_DWORD) under HKLM\SOFTWARE\Policies\Crayonic\Agent.
11.2 Deliver the settings
In the same GPO, open Computer Configuration → Preferences → Windows Settings → Registry and choose New → Registry Item:
| Field | Value |
|---|---|
| Action | Update |
| Hive | HKEY_LOCAL_MACHINE |
| Key Path | SOFTWARE\Policies\Crayonic\Agent |
| Value name | EffectiveSettings |
| Value type | REG_SZ |
| Value data | The line from Copy as one line (step 10) |
Paste one line
The Value data box keeps only the text before the first line break, and the machines would refuse the incomplete document. The exported line is also prepared for Group Policy Preferences, which replaces %NAME% with environment variables: it carries %, < and > in an escaped form.
Instead of typing the item, you can copy the exported .xml file in Explorer, then right-click Registry in the editor and choose Paste. You can also run the exported GPO script.
The settings window shows the same steps under By hand in Group Policy, with the key and the value name for the target you chose.
Machines apply the item at their next Group Policy refresh, about every 90 minutes, or at once with gpupdate /force. Within a minute of that, the agent applies the settings. No restart is needed.
11.3 Remove the old provider everywhere
Add a computer startup script (Computer Configuration → Policies → Windows Settings → Scripts → Startup). It does what step 3 does, on every machine:
@echo off
set "EXE=%ProgramW6432%\CrayonicAgent\CrayonicAgentService.exe"
if not exist "%EXE%" exit /b 0
"%EXE%" --settings --remove-old-provider >> "%ProgramData%\CrayonicAgent\remove-old-provider.log" 2>&1
exit /b %ERRORLEVEL%
It waits up to five minutes for the agent to start, which is normal at boot. It exits with:
0: the provider was removed, or there was nothing to remove;3010: it was removed, and the next restart finishes the job;1: it failed, and the log says why.
A machine with nothing to remove is done in a second.
The command is a Windows program: a batch file such as the one above waits for it, but PowerShell does not. For a PowerShell startup script or an Intune script, start it like this, or the exit code is lost. The path comes from ProgramW6432 because Intune runs scripts in a 32-bit PowerShell, where ProgramFiles points to Program Files (x86):
$exe = Join-Path $env:ProgramW6432 'CrayonicAgent\CrayonicAgentService.exe'
if (-not (Test-Path -LiteralPath $exe)) { 'Crayonic agent is not installed'; exit 1 }
$p = Start-Process -FilePath $exe -ArgumentList '--settings','--remove-old-provider' -Wait -PassThru -NoNewWindow -ErrorAction Stop
exit $p.ExitCode
11.4 Keep the updates pinned
The document you exported carries the pins from step 5. To roll out a new version:
-
Edit the versions in the document. Name the channel each version is published on:
"agent_update_policy": {"mode": "pinned", "target_version": "1.0.NNN", "channel_url": "https://release.crayonic.io/Agent/STABLE/"}, "fw_policy": {"mode": "pinned", "target_version": "1.4.NN", "channel_url": "https://release.crayonic.io/Firmware/STABLE/"} -
Deliver the new document to a pilot first: a second GPO linked to an OU holding a few machines. A GPO linked closer to the machines applies later and wins. Give it the complete document with only the versions changed. Both GPOs write the same single value, so nothing merges between them, and a pilot document holding only the update policies would drop every other setting on the pilot machines.
- Once the pilot machines work, update the main GPO.
Nothing is ever downgraded by a pin. {"mode": "hold"} stops automatic updates altogether. Alternatively, apply the new version on a test machine with step 8 or 9, pin it there, and export again.
11.5 Check that it arrived
On a machine, run gpupdate /force, wait a minute, then run:
"C:\Program Files\CrayonicAgent\CrayonicAgentService.exe" --settings --terminal-only
- The Group Policy line names the sections the policy sets:
agent_update_policy, bridge_settings, credential_provider, fw_policy. - If the line reads
REFUSED -, the reason follows it. - Rows marked
Gcome from Group Policy. - The readiness lines are the same as on the Setup tab.
gpresult /r /scope computerlists the GPOs a machine received.
11.6 Change or withdraw
To change the settings, edit the registry item, or paste a new line over its Value data.
A refused document is urgent
If the machines refuse the new document (for example, it was pasted over two lines), it replaces the previous good one, because both are the same value. Agent and bridge updates are held until you fix it, but nothing else of the document applies:
- On a machine whose start-up event reaches CDM, CDM's settings take over within about a minute. For a machine CDM does not manage, that switches badge sign-in off.
- On a machine that cannot reach CDM, running agents carry on, but after the agent's next restart badge sign-in is gone.
Removing the document is not a clean way back either:
- The bridges keep the last values written to them, unless CDM or the machine's own document states other values.
- The update pins go with it. The agent then follows the newest STABLE build again, and installs it if it is newer.
- After the agent's next restart it no longer serves badge sign-in, while the logon screen is still set to use it. Users then see a placeholder instead of badge tiles.
So never delete the value while you want updates pinned or badge sign-in on:
- To switch badge sign-in off, deliver a document with
"credprov_enabled": falsethat keeps the update policies. Leaving that document in place is the simplest end state. - Any replacement document must keep
agent_update_policyandfw_policy, and thecredential_providersection for as long as badge sign-in is wanted.
To retire the item itself, change its action to Delete and leave it in the GPO: each refresh then deletes the value.
Remove this item when it is no longer applied on the Common tab removes nothing by itself. It switches the item to Replace, which rewrites the value on every refresh while the item applies. It deletes the value only after the item stops applying, and only on machines that applied the ticked item before. So if you use it, wait until every machine has refreshed policy before you delete the item or unlink the GPO.
Delete the value only, never the whole key: the same key holds CloudSyncEnabled and CloudSyncUrl.
Without a domain
Machines outside a domain can take the same document in other ways:
- the exported
.regfile, withreg import <file> /reg:64as an administrator. Without/reg:64, a 32-bit runner such as an Intune Win32 app writes a machine-key export where the agent never looks; - the exported
.ps1, for example as an Intune platform script with Run this script using the logged on credentials set to No; - a
.jsonexport with--import.
Run --remove-old-provider from a script of its own (the PowerShell form above). The exported .ps1 ends with its own exit, so anything appended to it never runs.
Troubleshooting
| What you see | What to do |
|---|---|
| FIX Old credential provider | Remove it (step 3). Restart if the window asks. |
| FIX Credential provider (CP3) | If CP3 is not registered, reinstall the agent. If it is registered but switched off, delete the value Disabled under HKLM\SOFTWARE\Microsoft\Windows\CurrentVersion\Authentication\Credential Providers\{D41F8C90-3E6B-4A72-9C15-5B2E7A0D6F31}. If the Exclude credential providers policy hides it, take {D41F8C90-3E6B-4A72-9C15-5B2E7A0D6F31} out of that policy's list. |
| FIX Badge sign-in | Apply the preset (step 4). |
| FIX Bridge | Plug the bridge in, or try another USB port. |
| FIX Bridge mode | Apply the preset. If the bridge stays in the other mode, unplug it and plug it back in. |
| FIX Smart card reader (smartcard) | The reader appears about ten seconds after the bridge switches to smart card mode. Press Refresh. |
| FIX Smart Card service (smartcard) | In services.msc, set Smart Card to Manual or Automatic. |
| FIX Domain (smartcard) | Join the machine to the domain. Smart card logon does not work on a workgroup machine. |
| FIX FIDO interface (Entra FIDO) | Windows sees the bridge's FIDO interface about ten seconds after the bridge switches to FIDO mode. Press Refresh. If the bridge is in FIDO mode and the line stays, unplug the bridge and plug it back in. Bridge firmware before 1.4.76, and 1.4.81 (a rebuild of 1.4.71), shows the interface only while a badge is connected, so there the line is INFO until a badge connects. |
| FIX Microsoft Entra (Entra FIDO) | A machine in no domain: Settings > Accounts > Access work or school > Connect > Join this device to Microsoft Entra ID. Signing in from Connect alone only registers the device, which is not enough. A machine in a domain: set up Microsoft Entra hybrid join for it (Settings cannot Entra join a domain machine), and Microsoft Entra Kerberos in Active Directory. Or use the smartcard method. dsregcmd /status shows the join state. |
| FIX Windows (Entra FIDO) | Update Windows: Entra FIDO sign-in needs Windows 10 1909 or later (2004 on a hybrid joined machine), and does not work on Windows Server. |
| CHECK Updates | Pin the updates (step 5). |
| CHECK Updates: held while a settings document … | Fix the document the line names. Until then the update the line names (agent or bridge firmware) does not happen; a document that cannot be read at all (REFUSED) holds both. Usual causes: a misspelt key ("Mode"), a pin without target_version, a target_version without mode, or a document pasted over several lines. |
| "?" Bridge mode: not reported yet | The agent has only just started. Wait a few seconds and press Refresh. |
| No tile for a badge | Check the Devices tab. Below rssi means the badge is too far from the machine. If the badge is not listed at all, wake it with its button. |
| The tile is there but the badge does not connect | Hold the badge close to the bridge. The preset connects only a badge whose signal is stronger than -40 dBm. |
REFUSED - is not valid JSON on the Group Policy line |
The document arrived broken, almost always because it was pasted over several lines. Copy it again with Copy as one line, at once: until then updates are held and nothing else of the document applies (step 11). |
| A setting in the document has no effect | Look for its ! line in --settings --terminal-only, or in the window's banner and Status tab. A misspelt key, a bridge distance outside -100..0 dBm, or a section of the wrong shape is named there and left out; the rest applies. |
| Group Policy settings do not arrive | gpresult /r /scope computer must list the GPO.The item's Key Path must be SOFTWARE\Policies\Crayonic\Agent, without HKLM\.After gpupdate /force, allow a minute. |
| The startup script exits 1 | Read %ProgramData%\CrayonicAgent\remove-old-provider.log. Another installation is in progress clears on the next start. |
| Logon fails: the user name or password is incorrect | The domain controller refused the certificate. It must be strongly mapped to the user (Microsoft KB5014754). Do one of these: issue certificates that carry the user's SID extension; add a strong mapping to the account's altSecurityIdentities attribute, for example X509:<I>issuer<SR>serial or X509:<SKI>subject-key-id. |
To check a machine remotely, run the window in text mode from an administrator prompt. It prints the same readiness lines and device tree:
"C:\Program Files\CrayonicAgent\CrayonicAgentService.exe" --settings --terminal-only
Reference
What the presets set
| Setting | Smartcard | Entra FIDO | Meaning |
|---|---|---|---|
credprov_enabled |
on | on | Show badge tiles on the logon screen. |
credprov_logon_method |
smartcard | aad_fido | Sign in with the badge's PIV certificate, or with its passkey for Microsoft Entra ID. |
credprov_aad_fido_logon |
off | on | The older Entra FIDO switch, kept in step with the sign-in method for agents that predate it. |
credprov_auto_start |
on | on | Start the sign-in once the badge connects. |
credprov_auto_connect_on_select |
on | on | Connect the badge when its tile is selected. |
credprov_auto_fido_on_roster_connect |
on | on | Also start the sign-in when a badge connects on its own. |
credprov_name_from_credential |
on | on | Name tiles from what the badge itself presents: its certificate, or its sign-in. |
credprov_fido_nudge |
off | off | Do not restart a bridge function after each connect to wake Windows' own security-key tile. The badge tile runs its own sign-in and does not use that tile. |
credprov_rssi_min |
-60 dBm | -60 dBm | Show a tile only for a badge whose signal is at least this. |
credprov_hysteresis_db |
10 dB | 10 dB | Keep a shown tile until the signal falls 10 dB below that (-70 dBm), so tiles do not flicker. |
smartcard_bridge_enabled |
on | off | The bridge's smart card reader (CCID). |
fido_bridge_enabled |
off | on | The bridge's FIDO interface (CTAP-HID). The bridge runs either this or the smart card reader. |
rssi_connect_threshold |
-40 dBm | -40 dBm | The bridge connects a badge only above this: held close. Unset, it is 0, which connects at any distance. |
rssi_fastconnect_threshold |
-40 dBm | -40 dBm | The same gate for the bridge's fast connect, which needs two readings in a row above it. |
rssi_disconnect_threshold |
0 | 0 | No distance-based disconnect. The bridge keeps the badge until the link is lost. |
All of them are in the credential_provider section, except the last five, which are in bridge_settings.
What "Pin updates" sets
"agent_update_policy": {"mode": "pinned", "target_version": "<the agent's version>"},
"fw_policy":           {"mode": "pinned", "target_version": "<the bridge's firmware>"}
Without a channel_url, both use the STABLE channel. The modes are:
pinned: install exactly this version if it is newer;latest: follow the newest build on the channel;hold: never update automatically.
If nothing is set, the agent follows latest and the bridge firmware is held.
Command line
CrayonicAgentService.exe --settings followed by:
| Option | What it does |
|---|---|
--terminal-only |
Print the settings, readiness and devices as text. |
--gui |
Draw the window, even from a terminal. |
--export FILE |
Write this machine's saved settings to FILE. The extension picks the form: .txt (one line), .reg, .xml, .ps1, .json. |
--format NAME |
Name the form instead: line, reg, gpp, ps1, json, or gpo for the GPO script. |
--to policy or --to machine |
Where it lands on the other machines: the Group Policy key (default) or their own key. |
--from effective |
Export everything in force here, CDM and Group Policy included, not only the saved settings. |
--import FILE |
Save a .json document as this machine's own settings, replacing what was saved before. |
--remove-old-provider |
Remove CP1/CP2 if installed. Exits 0, 3010 (restart to finish) or 1. |
--wait SECONDS |
How long to wait for the agent to start (default 300). |
Where settings come from
Each source beats the ones before it:
- CDM, when the machine is enrolled.
- This machine's own settings (
HKLM\SOFTWARE\Crayonic\Agent), written by Save on this machine, the presets, the pin and--import. - Group Policy (
HKLM\SOFTWARE\Policies\Crayonic\Agent). - Apply until restart, which lasts until the agent restarts.
The Status tab shows which of these are in force.
Release channels
STABLE is for production, BETA and ALPHA for early testing, and DEV for daily development builds. A channel with nothing published says so when you list it.
Related
- Crayonic Agent — badge roster, CDM settings, sign-in telemetry and lock-on-disconnect
- Crayonic Credential Provider — how the logon tile behaves. The agent installs it; the standalone download is obsolete
- Crayonic Bridge — brings the badge to the workstation and drives proximity
- Crayonic Device Manager — the same settings, managed centrally for a fleet
- Downloads